If you’re tired of sitting on a wobbly or stained toilet seat, it might be time to change it. Don’t worry, changing a toilet seat is a straightforward process that you can easily do yourself with a few basic tools. In this article, we’ll walk you through the step-by-step process of changing a toilet seat.
Table of Contents
- Types of toilet seats
- Tools required for replacing a toilet seat
- Preparing to change the toilet seat
- Removing the old toilet seat
- Installing the new toilet seat
- Adjusting the new toilet seat
- Tips for maintaining a toilet seat
- Conclusion: Replacing or Changing A Toilet Seat
- FAQs
A toilet seat is an essential part of any bathroom. It’s where you spend some of your most private and intimate moments, so it’s essential to have a comfortable and sturdy toilet seat. Over time, toilet seats can wear out, become discolored, or crack, making them uncomfortable and unattractive. Fortunately, replacing a toilet seat is a relatively easy task that you can accomplish in just a few simple steps.
Types of toilet seats
Before we get into the process of changing a toilet seat, it’s essential to understand the different types of toilet seats available. The most common types of toilet seats are:
- Standard round toilet seat
- Elongated toilet seat
- Soft-closing toilet seat
- Decorative toilet seat
- Padded toilet seat
Tools required for replacing a toilet seat
You don’t need a lot of tools to change a toilet seat, but you will need the following:
- Flathead screwdriver
- Adjustable wrench or pliers
- Ruler or Measuring tape
- New toilet seat with mounting hardware
Preparing to change the toilet seat
Before you begin, make sure you have all the necessary tools and equipment. You should also take the time to clean the area around the toilet to ensure there’s no debris or dirt that could get in the way. Turn off the water supply to the toilet and flush it to remove any water from the tank and bowl.
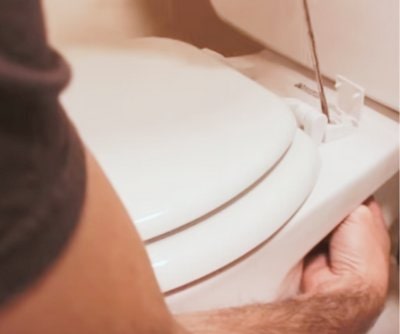
Removing the old toilet seat
The first step in changing a toilet seat is to remove the old one. Here’s how:
- Measure the size of your toilet to make sure your toilet is standard [Note: the distance between the two bolts holding the seat in place (located at the top of the toilet seat) as well as the seat’s length and width. Then, buy a toilet seat that will fit your measurements.]
- Locate the two bolts that hold the seat in place. These are usually located at the back of the toilet bowl and can be seen when you lift the lid.
- Using a flathead screwdriver, pry off the plastic caps that cover the bolts.
- Use an adjustable wrench or pliers to loosen the nuts that secure the bolts in place.
- Lift the old toilet seat straight up and off the bowl.
- Clean around the holes with baking soda to remove any dirt.
Tips: If you are having travel removing corroded bolts from the seat, spray some penetrating oil around the nut and let it sit overnight.
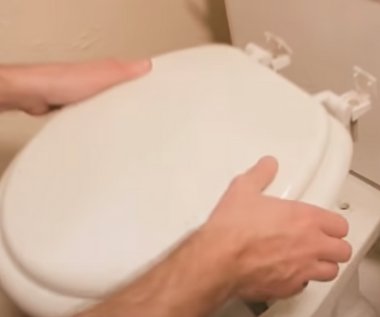
Installing the new toilet seat
Once you’ve removed the old toilet seat, it’s time to install the new one. Here’s how:
- Take the new toilet seat out of the box and remove any packaging or protective material.
- Place the new seat on the toilet bowl and align the bolt holes with the holes in the bowl.
- Insert the bolts into the holes and tighten the nuts by hand.
- Use a wrench or pliers to tighten the nuts further, but be careful not to overtighten them as this could damage the toilet bowl or seat.
- Snap the plastic caps back onto the bolts.
Adjusting the new toilet seat
Once you’ve installed the new toilet seat, you may need to adjust it to ensure it’s level and secure. Here’s how:
- Sit on the toilet seat to check if it wobbles or moves.
- If the seat is wobbly, tighten the nuts a little more until it’s secure. Be careful not to overtighten them as this could cause the toilet bowl to crack.
- If the seat is not level, adjust it by loosening one nut and tightening the other until it’s level.
Tips for maintaining a toilet seat
To ensure your new toilet seat lasts for as long as possible, here are a few tips to keep in mind:
- Clean the seat regularly with a mild cleaner and a soft cloth.
- Avoid using harsh chemicals or abrasive sponges that could scratch the surface of the seat.
- Tighten the nuts every few months to ensure the seat remains secure.
- If you notice any cracks or damage to the seat, replace it immediately.
Conclusion: Replacing or Changing A Toilet Seat
Replacing or changing a toilet seat is a relatively easy task that you can accomplish yourself with just a few basic tools. By following the steps outlined in this article, you’ll have a new, sturdy, and comfortable toilet seat in no time. Just remember to take your time, be careful, and follow the manufacturer’s instructions when installing a new seat.
FAQs
Do I need to turn off the water supply to the toilet before changing the seat?
Yes, it’s essential to turn off the water supply and flush the toilet to remove any water from the tank and bowl before changing the seat.
How often should I replace my toilet seat?
It’s recommended to replace your toilet seat every few years or as soon as you notice any cracks, damage, or discoloration.
Can I install a soft-closing toilet seat on my existing toilet?
Yes, many soft-closing toilet seats are designed to fit most standard toilets. Just make sure to check the manufacturer’s specifications before purchasing a new seat.
Do I need any special tools to change a toilet seat?
No, you only need a flathead screwdriver and an adjustable wrench or pliers to change a toilet seat.
How long does it take to change a toilet seat?
It usually takes less than 30 minutes to change a toilet seat, depending on your level of experience and the type of toilet seat you’re installing.